Saturday, 20 October 2012

Pinkies New Annual Catalogue Blog Hop


We're so glad you could join us on our Blog Hop. We'll be showcasing lots of gorgeous projects using products from the new Stampin' Up!® Annual Catalogue. Simply use the buttons at the end of each post to keep hopping. We love comments, so please do tell us what you think!

Hopefully you have arrived from the lovelCatherine's blog. I love what she has done with the Papillion Potpourri stamp set and isn't the matching punch just fabulous? No fiddly cutting out required!

So let's get "hopping" - the stamp set I chose to use is Fine Feathers. I think I have said previously I love birds so this was an stamp set I had to have! The clear mount set retails at £11.95 for 5 stamps - bargain! 

I have made a selection of cards using all the stamps from the set. The first card uses the pheasant feather image - I wanted to make it look like I had written the sentiment with the quill.  Have you spotted the card used for the top and card base? This is Naturals White which is new! It is fabulous for the "aged and distressed" look as it is flecked in appearance rather than a brilliant white. The sentiment from Curly Cute was stamped in Early Espresso ink and then the feather lined up using the
 Stamp-a-ma-jig and stamped in the same ink.  A piece of Victoria Crochet Trim was wrapped round the card and topped with a piece of the new Stitched Grosgrain ribbon in Early Espresso and a button from the new Natural Designer Buttons tied on with Linen Thread. The Early Espresso mat was punched at the bottom using the Scallop Edge Border punch.


Card number two uses the Naturals White card again. The feather images were stamped using Cajun Craze, Soft Suede and Summer Starfruit inks. The Designer Series Paper is from Comfort Cafe - isn't it lush? It is probably my favourite pack in the new catalogue. The sentiment is from Curly Cute again, stamped in Cajun Craze ink (using the Stamp-a-ma-jig again to get it straight!). A Cajun Craze button from the Regals Designer Buttons was tied on with a piece of Linen Thread. The mat is a piece of Soft Suede card which was run through the Big Shot using the Vintage Wallpaper Embossing Folder. The edges were all sponged with Crumb Cake ink using the new Stamping Sponges.


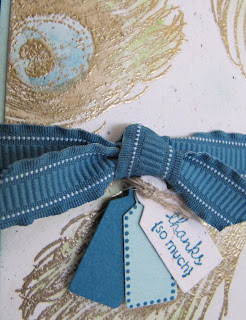
My final card uses the peacock feather image - it was also tricky to get a decent photo! The feather image was stamped in VersaMark ink onto the Naturals White card and then embossing using Gold Stampin' Emboss® Powder and the new Heat Tool. Colour was then added to the feathers using Island Indigo, Soft Suede and Gumball Green Inks and an Aqua Painter. The edges were sponged with Pool Party ink. A piece of Island Indigo Ruffled Ribbon was wrapped round and the tags added. I love these little tags - they are from the Tiny Tags stamp set and punched out with the Jewelry Tag Punch and tied with Linen Thread. This piece was then matted onto a piece of Pool Party card and a Pacific Point card base.


 Here is a close-up of the embossed feathers and tags - aren't they pretty?


Here is a list of the Stampin' Up! products used to make today's cards:

Stamp Sets: Fine Feathers (£11.95), Tiny Tags, Curly Cute
Inks: Versamark, Early Espresso, Cajun Craze, Soft Suede, Summer Starfruit, Pacific Point, Gumball Green
Cardstock: Naturals White (£6.75) Early Espresso, Soft Suede, Pacific Point, Pool Party
DSP: Comfort Cafe (£9.95)
Punches: Jewelry Tag, Scallop Edge Border
Big Shot: Vintage Wallpaper Textured Impressions Embossing Folder 
Other: Stitched Grosgrain Ribbon (£4.50), Ruffled Ribbon, Linen Thread, Crochet Trim, Naturals Designer Buttons (£5.50), Regals Designer Buttons, Stampin Emboss Powder, Aqua Painter, Stamping Sponges (£3.25), Stamp-a-ma-jig, Heat Tool

If you would like to order any of these products please either email me or give me a call on07530 368466    and I will be happy to help. 

I am really pleased with how the cards came out. I would love to hear what you think so please leave me a comment!

The next stop is Paula who has used the Serene Silhouettes stamp set - which happens to be one of my favourites from the new catalogue. She has some fabulous ideas for you.

I hope you enjoy the rest of the hop and have a crafty weekend!


Thursday, 18 October 2012

Simply Scrappin' with Merry Moments!

Good grief! Where has October gone?  Sorry I haven't been around much but I'm back!

I wanted to show you how versatile the Simply Scrappin'® kits are. Each kit contains 8 sheets of 12" x 12" card stock (in four different colours), 6 sheets of double-sided 12x12" paper (3 of each design) and 3 sheets of card stock stickers.  

There are four kits in the Annual Catalogue and one in the Autumn / Winter Catalogue. 

Today I am using the Merry Moments Simply Scrappin'® kit from the Autumn / Winter Catalogue pictured below:

Merry Moments Simply Scrappin'® by Stampin' Up!

Aren't the colours lush? They are Basic Grey, Old Olive, Cherry Cobbler and Very Vanilla  Fantastic for Christmas crafting but also lovely for male cards.

I wanted to show a couple of projects using this kit so I split it into two and today's post shows the 6" x 6" Scrapbook I made with one half.


Four sheets of plain cardstock (one of each colour) were cut down into 6" x 6" squares to give sixteen pieces.  A "spine" was then scored down each piece at 1/2" using the Simply Scored Scoring Tool and two holes punched through the cardstock.  The scrapbook was tied together using a length of 1/8" Taffeta Ribbon in Old Olive.  


The pages inside were all decorated just using the papers (3 sheets) and card stock stickers from the kit. The stickers are fabulous quality and the adhesive is initially respositionable (for about an hour) so if you change your mind and want to move a sticker - you can! 

The corners were rounded using the Corner punch. I added photo mats in Very Vanilla card but you don't need to do that.  Here are some of the pages, 


And the back!


This would make a fabulous gift for Christmas - either as an empty scrapbook or complete with pictures. The kits cost £18.95 and you could make two complete scrapbooks this size by just adding some ribbon.

Here is a list of the Stampin' Up! products used to make today's project:

Merry Moments Simply Scrappin' Kit
Cardstock: Very Vanilla
Punches: Corner
Other: 1/8" Taffeta Ribbon

If you would like to order any of these products please either email me or give me a call on 07530 368466     and I will be happy to help. 

Monday, 1 October 2012

In with the New Stampin' Up! Annual Catalogue

It's here! At last I can share the new 2012/13 Stampin' Up! Annual Catalogue with you! When I first saw it I couldn't believe how BIG it was - a massive 204 pages packed full of crafty loveliness. Does anyone remember the first Stampin' Up! Catalogue in 2007 - it only contained 96 pages! Hasn't Stampin' Up! come so far in that time - I love being part of such a successful company!


So, how do you get your own copy of the fabulous new Annual Catalogue?  If you host a party then you’ll be given a copy when you confirm your booking. If you've ordered more than £50 worth of products from me in the last three months then I’ll also pop a copy in the post to you with my compliments. 

If you’re not in either of these groups but you’d still like your own copy of the new Annual Catalogue (and let's face it you NEED it!), then all you need to do is email me and let me know. For just £4.95 I’ll post one out to you, along with a £5 voucher towards your first order worth £30 or more (excluding shipping). 


If you can't wait for the postman to arrive then the link in the sidebar will take you directly to an online copy of the new Annual Catalogue - make yourself a cup of tea - you may be some time!


And if that wasn't enough excitement for one day Stampin' Up! have given us a fantastic promotion for October and November. If you join my team of Dexterous Designers in October or November, not only will you get the brilliant value starter kit worth £175 for only £99, BUT you will also receive a FREE pack of Designer Series Paper every month for SIX months! To find out more click here.

I will be back over the next few days with some of the projects I have been making with the new products, but for now I suggest you grab that cup of cup of tea and have a browse through the new Stampin' Up! Annual Catalogue!

Sunday, 30 September 2012

Out with the Old ....

So we have said farewell to the 2011-2012 Idea Book and Catalogue. Did you manage to bag yourself a bargain from the Retired List?

What are you going to miss most? I think mine will be Sincere Salutations, Fox and Friends, The Timeless Type Junior Alphabet, Textured card, the 1 1/4" Striped Grosgrain Ribbon and Pear Pizzazz from the retired In-colors.

But fear not - the New 2012-2013 Annual Catalogue is PACKED with over 200 pages of new and exciting products which I can't wait to share with you.

There is a huge range of Clear and Wood mount stamp sets - over 200 in all - where will you put them all! New Ribbon to coordinate with the 2012-14 In-Color Collection, gorgeous new Embellishments, new Designer Series Papers, new Designer Fabrics, fabulous Linen Albums and Divided Page Protectors for the scrapbookers out there, lots of new Embossing Folders and Dies for the Big Shot, the new Classic Ink Pads, plus redesigns of old favourites like the Stampin' Scrub and Heat Tool.

Excited?! Well you will have to wait until tomorrow before I can show you but I promise it will be worth the wait!

Saturday, 22 September 2012

Hop this way with the Pinkies


Welcome to our first ever Pinkies Blog Hop. We'll be showcasing lots of gorgeous projects using products from the new Stampin' Up!® Autumn/Winter Catalogue. Our blog hop buttons will help guide you on your way. We love comments so please do tell us what you think!

Hopefully you have arrived from the lovely Michelle's blog. Isn't her project just stunning? I do love the Ornament Keepsakes stamp set - and the bundle which include the framelits is fantastic value.

So let's get "hopping" - the stamp set I chose to focus on is Tweet Leaves. I have a thing about birds and at £8.95 this stamp is a complete bargain! 

I decided to make a card folder and 4 cards. This is the outside of the folder. The scalloped rectangle was made using the Scallop Edge Border punch (and a steady hand!). The leaf image was stamped on Old Olive card in Versamark and I used White Stampin' Emboss® Powder and the Heat Tool to emboss the image.  I then cut out a leaf image from a piece of acetate using the Autumn Accents Bigz Die and Big Shot, and using this as a mask, sponged Old Olive ink round the edge to define the leaf shape.  The Designer Series Paper is from Orchard Harvest.  Have you spied the ribbon? It is the Scalloped Tulle Ribbon in Cherry Cobbler and ties in a bow beautifully!


And a close up of the gorgeous Flourish Designer Frame - aren't they beautiful? As you would expect with Stampin' Up! they coordinate with the Decorative Label Punch. Here I have punched a piece of Core'dinations Card Stock, run it through the Big Shot with the Woodgrain Textured Impressions Embossing Folder and sanded the top layer using the Stampin' Sanding System. I love these little tags - they are from the Tiny Tags stamp set and punched out with the Jewelry Tag Punch.


And so to the inside! The folder is a cinch to make using a piece of Crumb Cake card and the Simply Scored Scoring Tool. The card pockets are 2 simple boxes attached with Sticky Strip.  I sponged the leaf shape on the pockets to give it a bit of definition.


And to the cards! I wanted to show that this set wasn't just for autumn so made 4 "seasonal" cards to go inside the folder.  The Tweet Leaves image was stamped, embossed and sponged as on the front of the folder. You can get a better idea of the Core'dinations Card Stock in these pictures, I just love the effect you get with the Woodgrain Textured Impressions Embossing Folder and sanding the top layer just makes the whole texture "pop". The Taffeta Ribbon fits the Designer Ribbon Slides perfectly - aren't they a cute accent? The tags are again from the Tiny Tags stamp set, punched out with the Jewelry Tag Punch and tied to the slides with Linen Thread.


The colour combinations I used are as follows: Spring - Daffodil Delight and Certainly Celery, Summer - Perfect Plum & Melon Mambo,  Autumn - Old Olive and Riding Hood Red and Winter - Not Quite Navy and Pumpkin Pie. The card bases are all Crumb Cake card and I rounded the corners with the Corner Punch.


Here is a list of the Stampin' Up! products used to make today's project:

Stamp Sets: Tweet Leaves (£7.95)
Inks: Versamark, Early Espresso
Cardstock: Crumb Cake, Daffodil Delight, Certainly Celery, Perfect Plum, Melon Mambo, Old Olive, Riding Hood Red,Not Quite Navy, Early Espresso Core'dinations (£6.25)
DSP: Orchard Harvest
Punches: Jewelry Tag, Scallop Edge Border, Corner, Decorative Label
Big Shot: Woodgrain Textured Impressions Embossing Folder (£7.50), Autumn Accents Bigz Die (£18.95)
Other: Taffeta Ribbon, Scalloped Tulle Ribbon  (£6.25), Linen Thread, Flourish Designer Frame (£5.50), Emboss Powder, Designer Ribbon Slides (£4.50)

If you would like to order any of these products please either email me or give me a call on07530 368466    and I will be happy to help. 

I am really pleased with how the cards came out - and hopefully their new owner will also like them. I would love to hear what you think of my project so please leave me a comment!

And so now it is time to "Hop" on over to Catherine's blog where I know she has a lovely project for you using another bundle - this time it is the Scentsational Season bundle which has the cutest images! I hope you enjoy the rest of the hop and have a crafty weekend!


Friday, 21 September 2012

2013 Everyday Happenings Designer Calendar

Well I thought I would continue my quest to help everyone have a hand crafted Christmas! Today features the 2013 Everyday Happening Designer Calendar from the Autumn/Winter Catalogue which is just gorgeous and will make a great gift for family, friends or teachers! And the bonus is you don't have to do anything to it - although you could add significant dates to it if you are giving it to a family member!


Each month shows the days and also has a large area to keep a note of special dates and occasions which is a nice feature on a desktop calendar. On the reverse of the January page is the year at a glance - the other months feature a variety of coordinating designs on the reverse. You can purchase just the pages for £6.25 or the smart idea is to buy them in a bundle with the Desktop Display Calendar Case (as seen above) for £6.95 which is a bargain for such a pretty calendar.


Aren't the designs on the reverse of the calendar pages lovely? And an added bonus - once the year is over don't throw the calendar away - you will have some pretty background papers to use on cards! How cool is that - I like recycling!

I can see the Everyday Happenings Designer Calendar featuring as part of my Christmas gifts this year - how about you?

Don't forget to come back tomorrow for the Pinkies Blog Hop - you will be pleased to know I have done some "proper" crafting for that one!


Here is a list of the Stampin' Up!® Products used today:

Everyday Happenings Bundle (£6.95) - this contains the Designer Calendar and Display Case

If you would like to order this or any other Stampin' Up! products please either email me or give me a call on07530 368466       and I will be happy to help. 

Thursday, 20 September 2012

Noel Notes Simply Sent with Stampin' Up!

Someone told me today it was less than 100 days till Christmas - eeeek! Where has this year gone?  In the spirit of helping you get organised today's post gives you a wonderful solution if you want a "handcrafted" Christmas card, without having to do too much work!

The New Autumn/Winter Catalogue from Stampin' Up!® has some fantastic products if you aren't yet convinced that you are a crafter. One of those is the Noel Notes Simply Sent®. In the set you get everything to make 8 cards for £12.50: 8 die-cut cards in Cherry Cobbler, 8 Scalloped Card liners, 8 Envelopes, 8 Envelope Liners and 8 pieces of Gumball Green Taffeta Ribbon - all shown below:

Noel Notes Simply Sent® by Stampin' Up!®

This is what I did with one of the cards.  I found this picture I had taken of snowdrops in our garden - I love the way the green of the ribbon and envelope liner emphasise the green in the flowers.


These cards really are easy to assemble. The picture was attached using SNAIL Adhesive. The ribbon was then tied in a bow round the card and I used a Mini Glue Dot just to stop it slipping down.  The liner fits perfectly into the envelope and again is held in place with SNAIL.  The scalloped liner is held in place inside the card with a piece of Sticky Strip. Voila!  The hardest decision will probably be which picture should you use?

I have some exciting news for you! I belong to a fantastic Stampin' Up!® Team led by Michelle Last and on Saturday we are holding our first ever "Pinkies" Blog Hop to showcase some of the gorgeous products from the Autumn/Winter Catalogue. You will be able to "hop" from blog to blog to see what we have all been up to so make sure you come back for a look! 

Here is a list of the Stampin' Up!® Products used to make today's cards:

Noel Notes Simply Sent® (£12.50)
Other: Mini Glue Dots, SNAIL, Sticky Strip

If you would like to order any of these products please either email me or give me a call on07530 368466       and I will be happy to help. 

Don't forget my offer. Just place and order of £45 or more in September and I will send you a copy of the New Annual Catalogue for FREE (this offer is from me - not Stampin' Up!).